Of Code and Me

Somewhere to write down all the stuff I'm going to forget and then need

Setting child divider on an ExpandableListView causes weird flashing overlay on some Samsung phones November 29, 2011

Filed under: Android,Error — Rupert Bates @ 2:22 pm

This is a weird niche bug which I’m documenting here in case I need it in future.

Affected devices:
I have only seen it occur on a Samsung Galaxy S2 but I’m guessing it probably happens on any 2.x Samsung device running TouchWiz (it doesn’t happen on the Nexus S)

Steps to reproduce:
Create an activity with an ExpandableListView and set the childDivider property of the ExpandableListView to any colour, say red for ease of viewing


<ExpandableListView android:id="@+id/pageBundles"
                        android:layout_width="fill_parent"
                        android:layout_height="fill_parent"
                        android:childDivider="@color/red"
                        android:cacheColorHint="@color/white"/>

Now if you scroll the list for a while, particularly if you sort of wiggle it up and down quickly and then let it go the list will be completely covered by a solid block of the colour specified in the childDivider property. This will remain for a few seconds and then disappear.

To fix this issue just remove the childDivider property setting


Speaking at JAX London 2011 October 1, 2011

Filed under: Android,guardian.co.uk,Java — Rupert Bates @ 5:15 pm

I am going to be giving a talk about the development of the recently released Guardian app for Android at the Jax 2011 conference.
The session is on the 2nd of November, more details here


Guardian App On Android V 1.0 September 7, 2011

Filed under: Android,guardian.co.uk — Rupert Bates @ 2:58 pm

Finally! The project I’ve been working on for the last 5 months goes live…
https://market.android.com/details?id=com.guardian
And:
http://www.guardian.co.uk/help/insideguardian/2011/sep/07/guardian-android-app


How to save the position of a ScrollView when the orientation changes in Android July 28, 2011

Filed under: Android,Coding — Rupert Bates @ 2:29 pm

To save and restore the scroll position of a ScrollView when the phone orientation changes you can do the following:
Save the current position in the onSaveInstanceState method:

    protected void onSaveInstanceState(Bundle outState) {
        super.onSaveInstanceState(outState);
        outState.putIntArray("ARTICLE_SCROLL_POSITION",
                new int[]{ mScrollView.getScrollX(), mScrollView.getScrollY()});
    }

Then restore the position in the onRestoreInstanceState method, note that we need to post a runnable to the ScrollView to get this to work:

    protected void onRestoreInstanceState(Bundle savedInstanceState) {
        super.onRestoreInstanceState(savedInstanceState);
        final int[] position = savedInstanceState.getIntArray("ARTICLE_SCROLL_POSITION");
        if(position != null)
            mScrollView.post(new Runnable() {
                public void run() {
                    mScrollView.scrollTo(position[0], position[1]);
                }
            });
    }
 

Get your Android application to fill up the whole screen on a tablet June 24, 2011

Filed under: Android — Rupert Bates @ 7:30 pm

When I got hold of a Android 3 tablet, the first thing I did was to run one of the apps I’ve developed on it to see how it looked. I was surprised to see that it just ran in a little window, much like IPhone apps do on an IPad.

Fortunately getting the app to fill the whole screen just required the following line after the <application> section in my AndroidManifest.xml:


<uses-sdk  android:targetSdkVersion="9"/>


Failure [INSTALL_PARSE_FAILED_INCONSISTENT_CERTIFICATES] error when trying to install an app in Android June 11, 2011

Filed under: Android,Error — Rupert Bates @ 8:34 pm
             Failure [INSTALL_PARSE_FAILED_INCONSISTENT_CERTIFICATES]

This error occurs when you try to install an app via ADB and there is already another version of the same app which was installed from a different development machine.

To get round it uninstall the previous version and rerun the install.


Motorola Xoom connects to wi-fi but not the internet – How to fix it May 7, 2011

Filed under: Android,Error,Xoom — Rupert Bates @ 9:01 am

I’ve recently got a Motorola Xoom tablet and when I first tried to connect to the internet at home was surprised and annoyed to find that although it would connect to my wifi no problem, it could not get an internet connection.

It seems that the problem lies in the DHCP interaction between the Xoom and my wireless router which results in the Xoom not picking up gateway information from the router. The solution was to configure a static IP address for the Xoom.

To do this do the following:

  • Go into Settings, then ‘Wireless & networks’ then ‘Wi-Fi settings’
  • Find your wi-fi network in the list and press and hold then select ‘Modify network’ from the pop up
  • Scroll down to the ‘IP settings’ drop down and switch it from DHCP to Static
  • In the ‘IP address’ box enter the same IP address which is shown higher up the same form
  • In the ‘Gateway’ box you will need to put the IP address of your router, to find this out I opened a command prompt window on a PC on the same network and typed ipconfig this will give you a Default gateway address which is what you need
  • In the the ‘Network prefix length’ box put 24 (this assumes the subnet mask from ipconfig is 255.255.255.0)
  • Finally in the ‘DNS 1’ box put the same IP you put in the Gateway box
Now click Save, disconnect and reconnect from the network and when you are reconnected you should have internet access.
Note: There has been some discussion around the save button being greyed out, resulting in the following:
“the save option is usually greyed out until you have entered your password at the top, network prefix, and dns 1. make sure you have entered these things or else it wont let you save. also make sure you have entered them and they are not just grey. “
 

An example of how to run a background task and report progress in the status bar using AsyncTask on Android March 11, 2011

Filed under: Android — Rupert Bates @ 5:13 pm

Why use background tasks?

In Android it is crucial that any long running tasks are performed on a separate thread from the main (UI) thread, otherwise your application will appear slow and unresponsive and in some cases may be terminated by the operating system.

About AsyncTask

To simplify the running of tasks on a background thread and reporting of progress back to the UI thread, Android 1.5 introduced the AsyncTask class. For previous versions of Android you can copy the class UserTask into your application and use that instead.

AsyncTask is an abstract generic class, meaning that it must be subclassed to be used and its type signature specifies the parameters, the progress values and the final value of the task.

There is only one method on AsyncTask that must be implemented doInBackground, this executes on the background (non UI) thread and is where you write the code to perform your long running task.

In addition there are 4 other methods which can be implemented according to your needs, all run on the UI thread:

  • onPreExecute – called before the task begins, used to initialise the progress reporting UI
  • onProgressUpdate – called whenever publishProgress is called from the background task, used to report progress back to the UI
  • onPostExecute – called when the task completes
  • onCancelled – called if a task is cancelled

About notifications

Notifications are a good way to let users know about significant events in your application, they appear in the status bar of the phone and can contain extended information which is visible to the user if they ‘pull down’ the status bar.

Ongoing notifications (those with the FLAG_ONGOING_EVENT flag set) are particularly good for reporting the progress of background tasks because they are themselves in the background from a UI point of view, provide information that something is occuring but do not stop the user from continuing to use your applicaton.

An example

As an example of the use of AsyncTasks and Notifications I have built a simple application which simulates a file download task with progress updates in a status bar notification.

The source is available on GitHub https://github.com/rupertbates/AndroidStatusBarTest

The application

The app is a simple activity with a button which triggers the background task and a list underneath, this is just so that we can test that the UI is still responsive while the background task is running.
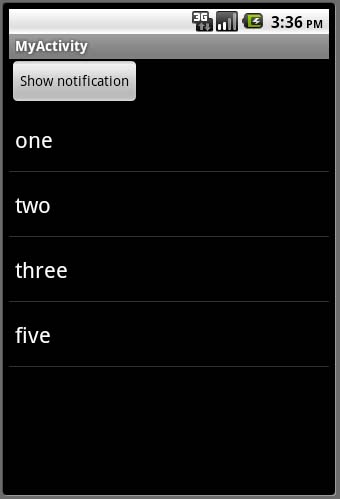
screenshot 1

The main activity

When the user clicks on the button a notification appears in the status bar
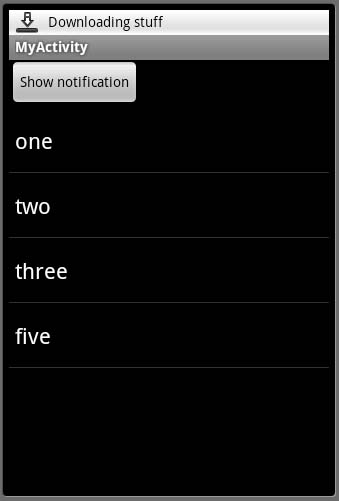
screenshot 2

Notification in status bar

If the user pulls down the status bar they see an extended message, showing the progress of the task. This is continually updated until the task is complete

screenshot 3

Extended information in the status bar pull down

Whilst the task is going on the UI remains responsive, we can select list items or perform any other actions
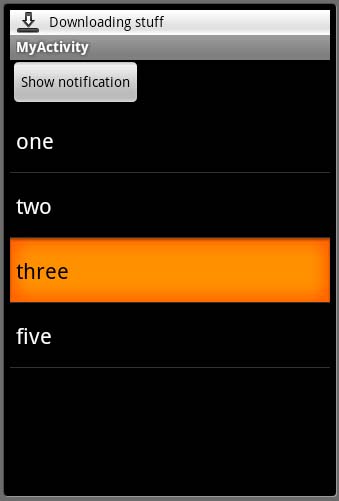
screenshot 4

UI remains responsive while the task is in progress

The code

There are three classes in the application:

  • MyActivity – a simple activity with a button and a list
  • NotificationHelper – a class to manage interaction with the status bar
  • DownloadTask – the class that runs the background task

MyActivity is a straightforward Activity, all we do with it is set up the button to call the createNotification method as follows:

        Button button = (Button) findViewById(R.id.notificationButton);
        button.setOnClickListener(new View.OnClickListener()
        {
            public void onClick(View v) {
                createNotification();
            }
        });
    private void createNotification() {
        new DownloadTask(getApplicationContext()).execute(0);
    }

NotificationHelper is more interesting, it encapsulates interaction with the status bar, it takes a Context in its constructor as this is needed to create notifications and has 3 methods:

  • createNotification – this puts the notification into the status bar
  • progressUpdate – receives progress updates from the background task and updates the status bar notification appropriately
  • completed – called when the background task is complete, this removes the notification from the status bar. We could also use this to add a new ‘task complete’ notification
package com.example;

import android.app.Notification;
import android.app.NotificationManager;
import android.app.PendingIntent;
import android.content.Context;
import android.content.Intent;

public class NotificationHelper {
    private Context mContext;
    private int NOTIFICATION_ID = 1;
    private Notification mNotification;
    private NotificationManager mNotificationManager;
    private PendingIntent mContentIntent;
    private CharSequence mContentTitle;
    public NotificationHelper(Context context)
    {
        mContext = context;
    }

    /**
     * Put the notification into the status bar
     */
    public void createNotification() {
        //get the notification manager
        mNotificationManager = (NotificationManager) mContext.getSystemService(Context.NOTIFICATION_SERVICE);

        //create the notification
        int icon = android.R.drawable.stat_sys_download;
        CharSequence tickerText = mContext.getString(R.string.download_ticker); //Initial text that appears in the status bar
        long when = System.currentTimeMillis();
        mNotification = new Notification(icon, tickerText, when);

        //create the content which is shown in the notification pulldown
        mContentTitle = mContext.getString(R.string.content_title); //Full title of the notification in the pull down
        CharSequence contentText = "0% complete"; //Text of the notification in the pull down

        //you have to set a PendingIntent on a notification to tell the system what you want it to do when the notification is selected
        //I don't want to use this here so I'm just creating a blank one
        Intent notificationIntent = new Intent();
        mContentIntent = PendingIntent.getActivity(mContext, 0, notificationIntent, 0);

        //add the additional content and intent to the notification
        mNotification.setLatestEventInfo(mContext, mContentTitle, contentText, mContentIntent);

        //make this notification appear in the 'Ongoing events' section
        mNotification.flags = Notification.FLAG_ONGOING_EVENT;

        //show the notification
        mNotificationManager.notify(NOTIFICATION_ID, mNotification);
    }

    /**
     * Receives progress updates from the background task and updates the status bar notification appropriately
     * @param percentageComplete
     */
    public void progressUpdate(int percentageComplete) {
        //build up the new status message
        CharSequence contentText = percentageComplete + "% complete";
        //publish it to the status bar
        mNotification.setLatestEventInfo(mContext, mContentTitle, contentText, mContentIntent);
        mNotificationManager.notify(NOTIFICATION_ID, mNotification);
    }

    /**
     * called when the background task is complete, this removes the notification from the status bar.
     * We could also use this to add a new ‘task complete’ notification
     */
    public void completed()    {
        //remove the notification from the status bar
        mNotificationManager.cancel(NOTIFICATION_ID);
    }
}

DownloadTask brings the whole thing together. It inherits from AsyncTask and the generic parameters specify

  • the initial type passed into the execute method (Integer)
  • the type progress updates are reported in (Integer)
  • the type that the completed task returns (Void).

The tasks constructor creates an Notification helper which is used to interact with the status bar, this happens in the 3 methods which run on the UI thread

  • onPreExecute – called before the task starts, this creates the notification
  • onProgressUpdate – receives progress updates from the background thread and updates the notification
  • onPostExecute – called when the task completes , removes the notification from the status bar

The doInBackground method is the method which runs on the background thread, this is where we would do the real work of the task reporting progress back to the UI thread by calling publishProgress. In this example I am just looping for 10 seconds, reporting progress every second.

package com.example;

import android.content.Context;
import android.os.AsyncTask;

public class DownloadTask extends AsyncTask{
    private NotificationHelper mNotificationHelper;
    public DownloadTask(Context context){
        mNotificationHelper = new NotificationHelper(context);
    }

    protected void onPreExecute(){
        //Create the notification in the statusbar
        mNotificationHelper.createNotification();
    }

    @Override
    protected Void doInBackground(Integer... integers) {
        //This is where we would do the actual download stuff
        //for now I'm just going to loop for 10 seconds
        // publishing progress every second
        for (int i=10;i<=100;i += 10)
            {
                try {
                    Thread.sleep(1000);
                    publishProgress(i);

                } catch (InterruptedException e) {
                    e.printStackTrace();
                }
            }
        return null;
    }
    protected void onProgressUpdate(Integer... progress) {
        //This method runs on the UI thread, it receives progress updates
        //from the background thread and publishes them to the status bar
        mNotificationHelper.progressUpdate(progress[0]);
    }
    protected void onPostExecute(Void result)    {
        //The task is complete, tell the status bar about it
        mNotificationHelper.completed();
    }
}

Hope this is useful to someone, if you have questions let me know.


java.net.UnknownHostException on Android – a list of possible causes February 22, 2011

Filed under: Android,Error,WebServices — Rupert Bates @ 3:54 pm

This is a list of possible solutions to the error:

     java.net.UnknownHostException: myapp.co.uk  at java.net.InetAddress.lookupHostByName(InetAddress.java:513)

when trying to access a website on Android.

They run from most to least likely, start at the top and work your way down:

  1. Check that you have <uses-permission android:name=”android.permission.INTERNET” /> set in your AndroidManifest.xml file (on the same level as application tag)
  2. If you are behind a proxy you may need to do the following:
    System.setProperty("http.proxyHost", "my.proxyhost.com");
    System.setProperty("http.proxyPort", "1234");
    
  3. If you are using an emulator try deleting and recreating the virtual device.
  4. If you are on a real device try switching the wifi on and then off again
  5. If it is something which happens once when an emulator or device boots but is ok later you could try ‘warming up’ the dns by running code such as the following before your own web request :
    try {
    InetAddress address = InetAddress.getByName(Url);
    } catch (UnknownHostException e) {
    e.printStackTrace();
    }
    
  6. Try rebooting your development machine – I’ve heard of this working

If none of the above work and you find another solution then let me know.


Error .apk.res not found In IntelliJ Idea Android project January 27, 2011

Filed under: Android,Error,Git,IntelliJ,Java — Rupert Bates @ 10:32 am

After pulling the latest source of an android project I am working on from GitHub I got the following error:


MyProject.apk.res not found. Try to rebuild project

But no amount of rebuilding would fix it.
It turned out that the problem was that somehow the Module had lost track of which Android platform it is targeted to. To fix it I did the following:

  1. Bring up the Project Structure dialog (File/Project Structure or ctrl+alt+shift+s)
  2. Make sure that Modules is selected in the Project settings pane (far left)
  3. Expand the node with the name of your project in the middle pane and click on the Android node underneath it. This selects the Android facet.
  4. At the top of the Facet pane there is a drop-down list which you can use to select your Android platform. If there are no entries in this you can create a new one by clicking ‘New’ and locating the directory your Android SDK is installed in.
  5. Click Ok and rebuild, the problem should now be fixed

It seems that the problem is caused by Git in some way, but I’m not exactly sure how yet. I’ll update here if I find out why.